Your First Propagation Station: Build It with Test Tubes (No Fancy Gear Needed)
You’ve got a healthy pothos vine, a few philodendron leaves, and maybe a monstera cutting with a node or two. You’ve tried placing them in water on your sunny windowsill, but now you’ve got a messy pile of stems, murky water, and roots tangling together. You’re not alone. That pile of cuttings on your windowsill? It’s a common frustration—water gets murky, roots get tangled, and it’s hard to tell which cuttings are thriving. Worse, the lack of clear space makes it impossible to spot early issues like root rot or mold before they spread.
We’ve been there too. Early on, we tried everything: glass jars, mason jars, even a repurposed yogurt container. The problem wasn’t the cuttings—it was the system. Without clear visibility, good airflow, and space to breathe, propagation becomes a guessing game. That’s why we ditched the clutter and built a simple, modular station using test tubes. It’s not about lab-grade precision; it’s about giving each cutting the clean, focused care it needs to root confidently. And the best part? You likely have everything you need already.
Why Test Tubes Beat Jars (and What Most People Miss)
Most beginners dive straight into water propagation without considering space or visibility. Jars stack messily. They trap humidity unevenly. And when roots start growing thick, it’s impossible to see if they’re healthy or slimy without disturbing the whole batch. The real missing piece? Modularity. Each cutting needs its own space to grow without competition. Test tubes solve this instantly—they’re narrow, easy to arrange, and let you see roots clearly at a glance.
The hidden cost of ignoring this? Root rot spreads faster when cuttings are crowded. A single rotting stem can sink an entire batch. We learned this the hard way with a group of spider plant babies in a single jar. Within a week, one was blackened, and the others were struggling. Test tubes prevent that by keeping each cutting isolated and visible.
How to Build Your Station (With Things You Already Own)
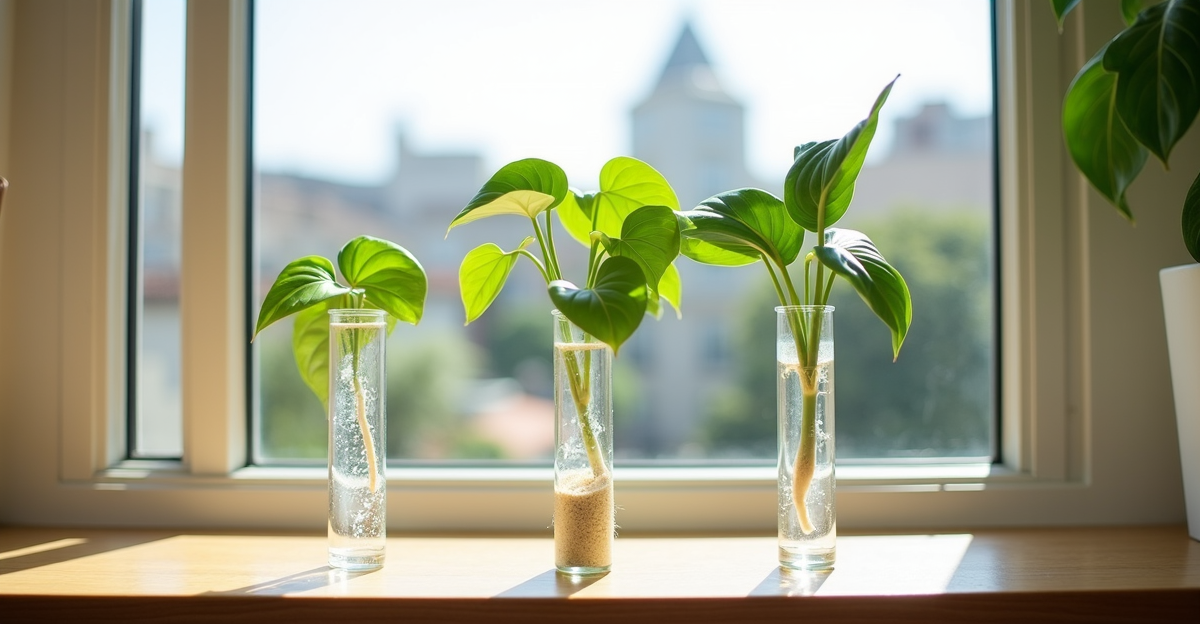
Forget expensive kits. Your station starts with three things: test tubes (or clean, narrow glass vials), a shallow tray, and a small fan for airflow. We use 10–15ml test tubes from a local science store or even empty medicine vials. The key is narrow width—it keeps roots contained and prevents them from touching the sides.
Here’s the setup:
– Place your test tubes in a shallow baking sheet or a plastic tray lined with a damp paper towel (to keep moisture consistent without drowning the base).
– Fill each tube with 1–2 inches of room-temperature water.
– Add one cutting per tube, making sure the node (the bump where leaves meet stem) is submerged.
– Place the tray in a bright, indirect spot—like an east-facing window or under a grow light—avoiding direct sun that can heat the water too much.
Pro tip: Use a small desk fan on low, blowing across the tray (not directly at the tubes) for gentle airflow. This mimics natural breezes and reduces mold risk without drying out the cuttings.
Real-Life Example: My North-Facing Bedroom Setup
I run a small propagation station in my north-facing bedroom—a space with dry, low light but consistent humidity from my humidifier. My pothos and philodendron cuttings thrive here. Each tube gets 1–2 inches of water, placed on the tray near the window. I check them weekly: I see if roots are growing (a sign of health), if the water is cloudy (time to change it), and if any cuttings need adjusting (like lifting a stem that’s floating). The narrow tubes mean I never have to untangle roots to check on one cutting.
Why it works: The low light isn’t a problem because water propagation doesn’t rely on photosynthesis like soil does. The dry winter air? The tray’s damp paper towel keeps the base humid enough. And the visual clarity means I catch issues before they worsen.
Seasonal Adjustments & Trade-Offs (Be Honest About This)
This method shines in spring and summer when cuttings root fastest. But in winter? Water cools faster, slowing root growth. You’ll need to check tubes more often—maybe every 3–4 days instead of 5–7—to change cloudy water (which can harbor bacteria). Also, avoid using cold tap water directly from the faucet; let it sit for 24 hours to reach room temp.
Trade-offs to know:
– Test tubes won’t work for large cuttings (like a big monstera leaf). Stick to 4–6 inch stems with at least one node.
– They’re not for soil propagation. This is strictly for water. If you’re using LECA or soil, this station won’t help.
– Roots grow in the tube, not around it. You’ll need to transfer cuttings to soil or LECA once roots are 1–2 inches long. Don’t leave them in water too long—overwatering roots is a real risk.
Troubleshooting Common Hiccups (Before They Spread)
- Cloudy water? Change it immediately. This means bacteria or mold is growing. Rinse tubes with a soft brush before refilling.
- Roots turning black? That’s rot. Remove the cutting, trim off the black part, and restart in fresh water.
- No roots after 3 weeks? Check your light (needs bright, indirect), water temp (too cold slows growth), and stem health (cut just below a node).
- Mold on the water surface? This happens if the air’s too still. Add that gentle fan we mentioned.
Important: Never add anything to the water (like sugar or aspirin). It can attract pests or cause more rot. Clean water is all you need.
Why This Matters for Your Overall Setup
A modular station isn’t just for propagation—it’s a mindset shift. Once you see how clear visibility and separation reduce stress, it changes how you care for all your plants. You’ll start thinking about space, airflow, and monitoring before problems arise. It’s why we’ve moved away from stacking cuttings in one jar and now use this station for every new plant we try to propagate.
And here’s the thing: once your cuttings root, you’ll need a place to move them. That’s where good planters make all the difference. A standard pot might be too big for a small rooted cutting, or it might not suit your aesthetic. You want something that fits your shelf, complements your style, and supports healthy growth without overwhelming the plant.
Key Takeaways
- Test tubes = clean, visible propagation without tangled roots or hidden issues.
- Check water weekly—cloudy water means it’s time to refresh.
- Transfer rooted cuttings to a well-fitting planter before roots get too long.
When you’re ready to grow your setup, explore our 3D-printed planters.